(The second of a multi-part series.)
Did you know it’s possible to work your virtual machines at 100% efficiency without sacrificing performance?
Ever wonder how to best manage your virtual machines within the VSystems environment?
In my first post about virtual CPUs, I made the point that less is more in the virtual world. In this post, I’ll explore opportunities and performance improvements you can make to your Virtual Systems virtual machines.
How to Manage vCPU Allocation on Your Virtual Machines
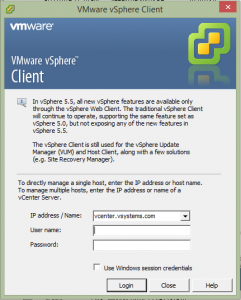
1. Install the vSphere desktop client. Currently, VSystems uses vSphere desktop client version 5.5.
2. Log in to vcenter.vsystems.com using the credentials provided by the VSystems Help Desk.
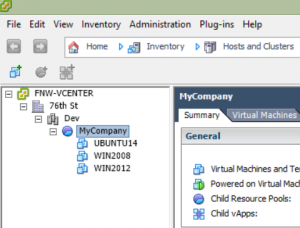
3. Your virtual machines will display in the left-hand column.
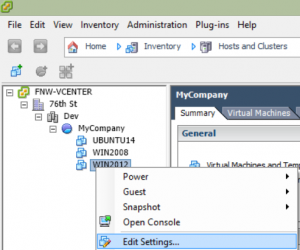
4. Right click on any virtual machine and select Edit Settings.
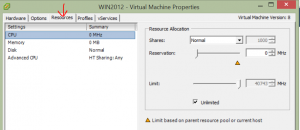
5. Click on the Resources tab to begin customizing your vCPU.
In this example, if you have a pool with a maximum of 5,000 GHz of CPU with each of your three virtual machines, then each virtual machine has 1vCPU that can max out at 2.2 GHz (2,200 MHz).
- To maximize processing performance for a high-priority production VM such as WIN2012, slide the Reservation bar to the desired MHz, or type directly into the dialog box to the right. For our purposes, let’s maximize MHz at 2,200.
- The remaining 2.8 GHz are shared among your other VMs (WIN2008 and UBUNTU14). This could be a satisfactory setup as long as each machine does not have much CPU usage. If each virtual machine were working at 50% capacity, your resource pool would still have excess CPU resources.
Allocate vCPU Resources to Align with Business Priorities
The key point to remember is that less is more in the virtual world. You can give some dedicated CPU resources to production VMs and let the other share resources. Most VMs will not run at a high CPU capacity all the time. However, if they do, you can make sure the resources are always available for that VM.
Next time I will talk about more CPU options such as shares, limits and advanced options.


